Tuesday, December 14, 2021

Improvement prompts and ideas

 Many of the units as part of the evaluation require you to write about improving your work. Here's some tips with regards to writing this up.

Do not copy these word for word and do not use in bullet point form as seen here - re-form in your own words in full sentences.


Use the word Improve when you're writing this work up, it's one of the key words in the criteria and it's important to use these key words and phrases.

Instead of using the internet, improve my research work by using the Journals in the LRC or books to do my research.

Improve my work by accepting that I can learn by making mistakes and then simply re-do the work and improve it.

I can improve my work by not rushing and accepting that I may need to stay behind, come in earlier or on non-college days.

I can improve my work by working cleaner and more efficiently and tidying up as I go.

I can improve my work by simply using my DSLR at home and outside of college in a variety of different situations and make observations with regards what works and what doesn't. This type of work can be added to my design sheets and help improve my grades.

I can improve my work by doing it sooner rather than later.

I can improve my use of equipment by using it more frequently and researching the equipment in more depth.

I can improve my use of materials, by actually using them and practicing with them and using the materials to their full capabilities. (Write about the specific materials).

I can improve my images by paying more attention to exposure, using things such as Grey Cards or bracketing.

I can improve my images by shooting when the light is better and generally be more aware of the impact of light on my images. I can do this by practicing in a different range of lighting situations and observe how the light affects the subject and exposure values.

I can improve my images by using things like reflectors and flash guns to fill in the shadows.

I can improve my work by always using a tripod

My work could have been improved by using a greater range of films so enabling me to have a better knowledge of the right types of films for specific jobs/photography. 

I can improve my work by ensuring I use the correct white balance in certain situations.

My work could have been improved by producing evaluations on a weekly basis or every time I did a set of images.

I can improve my work by using the books that have been recommended and reading about techniques, materials and processes.

I could have improved my photographs by choosing to shoot in better light so enabling faster shutter speeds. 

I can improve my work by being more creative and trying different ideas.

I could have improved my work by using a tripod, this would have limited the amount of blur in my images. 

I can improve my work by not using the same models/people in my shoots.

I could have improved my work by first trying the idea out using my digital camera using the same ISO settings.

I can improve my ideas by always looking at the work of contemporary and historically relevant artists.

I can improve my my ideas by looking at and being aware of all other types of art.

I can improve my work by paying attention to all of the stages of any of the processes we use.

I can improve my work by using the right type of films for the situation/light.

I can improve my work by printing on the right types of photographic papers.

I can improve my work by the application and use of the right materials that help to evoke meaning, message and narrative in the images. (Use examples).

I can improve my image by shooting at the right times of day when shooting on location. (Use example).

I can improve my work by being self-critical 

I can improve my work by being analytical when writing about it asking what if in the context of explaining aspects of it. 

I can improve my work by using far more images and portfolio style images mid-way through my assignments.

I can improve my work by reflecting at the end of each significant stage or on a weekly basis. 

I can improve my work by writing up comprehensive plans and using floor plans at the start of studio shoots.

I can improve my work by writing about H&S throughout the work on a consistent basis. 

I can improve my work by trying to work in the same way as professionals and get my work to look like professional photographers work.

I can improve my work by being fully aware of what's going in in the background of my images and how the background helps to tell the story.

I can improve the quality of my black and white prints by looking after my negatives and storing them properly in neg bags ensuring they don't get covered in dust. 


Thursday, September 23, 2021

Basic digital camera set up

The intention here is that you're able to set up your camera correctly and use it in a way that forces you to understand issues that surround the complexities of working with variable light sources.

In your design sheets you should identify the following knowledge by explaining how your camera is set up and used as well as the basic principles behind making exposures. 

*Note those of you have bought the book Langfords starting Photography should refer to the book for additional help. There is also a very useful link at the bottom of the page. 


ISO - What is ISO and why do we use manual ISO?
White balance - What is white balance, what are the options and how do we use white balance in our photography?
Aperture - What is aperture - how do we adjust it and what is happening inside the lens when we make adjustments to the aperture. How does this affect the exposure.
Shutter speed - What is shutter speed, how do we adjust it, what is the optimum shutter speed and what is the impact of shutter speed on the images and how does it affect the exposure?
What is Auto focus and manual focus - What are their pros and cons?
What file types does my camera use for the image captures - Explain your cameras options with regards the file types and sizes for image capturing. Explain how these are set up in the menu.
Lens - What is the focal length options with your lens - how does this impact on your images?
Light meter - How do you use your light meter and what is subject failure?

Exposure - What is exposure - what are EV's? What is the Kodak Rule and how do Aperture - Shutter speed and ISO integrate to enable you to control the exposure?

Subject failure & 18% Grey cards - what is subject failure and how can you avoid it using an 18% grey card or other mid tone light reading (Hand/skin tone). 

Using the headings above in your design sheets - write up your answers and explanations to these accompanied by images that illustrate your learning and knowledge.


Evaluation requirement for Unit 09

 If you look through the assignment at the evaluation criteria (Below) the key thing you need to do simply to attain a pass is clarified in section 9/C.P5 and 9/CP6. Ideally you would all aim to attain the higher grades which is slightly more complex and requires more than simple explanations.


When you type your work up in your design sheets, make sure you use a bold heading. What you should be aiming to do is write about the worth of the knowledge and skills you've gained during the two sections of the 'Sinister' brief. 

Once you've typed up the heading in bold... Evaluation you then type up another for each of the sections you need to write about - (1)Materials; (2)Techniques; (3)Processes.

(1)Materials Identify again the materials that you've used and then write a paragraph about the fact that previously you had little or no knowledge of these materials, then explain why this new knowledge and the fact that you've been able to use them has been useful to you as someone learning about photography. You might want to mention the fact that this kind of knowledge is only accessible generally through education and not widely available to the public/wider population. If possible explain how the knowledge of these materials is going to benefit you as you move forward on the course.

(2). Techniques As above use the same approach but this time in terms of the techniques you've used... These include Pinhole camera; Dish processing of prints; Daylight exposure; Scanning with flatbed scanners; Post production using Photoshop. 

(3). Process As above in section (1), but discussing processes... (1). Exposing media (Photopaper) using a cardboard box as  camera and making images. (2). Processing Silver-based media using chemicals e.g. wet processing in the darkroom. (3). Editing images and improving them using digital manipulation methods (Photoshop). 

Finally - write up a number of paragraphs where you identify your weaknesses, deficiencies and lack of knowledge and make detailed suggestions of what you think you need to do in order to improve further. *Note you're at the start of your Photographic journey and one of the main observations with regards this is the more you do, the more you read and study and make pictures the better you'll get and improvement will happen gradually. 

Tuesday, June 1, 2021

Communicating Intention


Using your research work as well as your own work you need to...

Demonstrate an in-depth and imaginative exploration into photographic materials, techniques and processes, evaluating how they are used to communicate creative intentions. 

One of the main aspects of this unit is to clearly demonstrate you understand what it means by Creative Intention. 

If you read through the assignment brief you'll see that the creative intention is to produce 4 images that evoke 'Sinister/creepy/scary/disturbing' images. You should therefore start your work (On the first page of the practical work) with a short introduction that uses the learning aim and the pass criteria A.P1 as an explanation of what you need to do. Additionally, mention the Book cover aspect of the work explaining that your use of materials, techniques and processes will make this possible.

Therefore...

  1. You've got to produce 'Sinister/creepy' images.
  2. The materials you use will enhance the feel and narrative of your images.
  3. The technique you use will enhance the feel and narrative of your images.
  4. The processes you use will enhance the feel and narrative of your images.
*Narrative - The story or message behind the images e.g. what you're trying to convey through the images, in this set of images the meaning//message is Sinister/Creepy

_______________________________________________________________

The research that you've done over the summer on Lauren E Simonutti and Deborah Turberville needs to include your analysis of the images in terms what they convey e.g. how they look, the mood and how they've been shot and the materials used has helped the images look that way.

Neither of the photographers work with colour, so this sets a  tone and mood that you need to describe and comment on. The technique and process - which includes how the images were designed needs to be analysed. How are the models arranged in the images, how are they posed, do they look happy, are they in an environment that fits the way they look, what might the story be behind  the images? Consider all of these things and make sense of them - are the images generally happy and upbeat or is there something sinister and dark about them? You need to described  this 'Feel' and 'Mood' that the artist/photographer has created.

Images in professional scenarios are created with intention, they're designed and/or selected for use as they convey meaning or messages. This is known as Visual Language and it's one of the tools you need to increasingly use in your work. Here below is a series of questions that you can use when trying to analyse the Creative Intention in images you might be researching.

  • What is the purpose of the images - what kind of images are they and where might you expect to see them?
  • How can you tell that the images have an intended purpose - what indicates their purpose and use - in terms of the techniques, materials and processes used?
  • Are the images produced in colour or B&W and how does this evoke meaning and message? (Process and technique).
  • What is the narrative, are the images designed so that there's a story within the images? (Process)
  • Does the angle of the camera/viewpoint add to the feel and mood of the images, what makes them strange or odd (Sinister)?
Check Deborah Turbervilles page here as it mentions her technique https://en.wikipedia.org/wiki/Deborah_Turbeville#Technique

More Turberville links...

https://www.youtube.com/watch?v=zPAO2qATEk8 video where she explains her techniques.
https://www.youtube.com/watch?v=F2aaAHgp90U   video where you see the lighting, camera and techniques used.

This following video was shot probably just before she died. In this one she's using a digital camera, so she probably moved to using digital cameras later in her career. You'll see she's still using 'Ambient' light, but also using reflectors to reduce the shadowy affect seen in much of her work. Note too the large object on the tripod, this is a monitor (Computer screen) that allows her and or the client to see each image being captured and to check and view each image as they're being shot. @ 15 second into the video you'll see an assistant holding a small light above the model (LED panel light), so the approach here isn't typical of her earlier work and probably doesn't have that same eerie sinister feel to it. You may even notice that the assistant seems to have the camera in her hand and is shooting some of the images. This is perfectly okay as the ideas and the lighting are all Turbervilles and she's just instructed the assistant to take the shots. 

Luaren E Simonutti links

Photographic notes from a madhouse - Photographs by Lauren E. Simonutti | LensCulture towards the bottom of this article are details about techniques and materials. 

Update - The following video links have guidance and comments which will be helpful in your analysis and evaluations of the videos.


Monday, May 31, 2021

How to create and use the A3 design sheet


Click here 1st and watch the video.

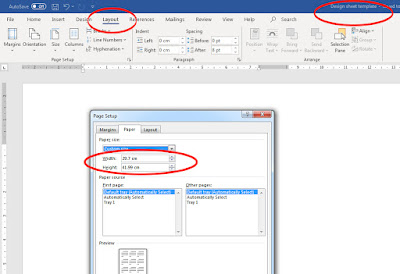
Open up a new word document, name it ‘Design sheet template’.
In layout set the page up to A3 (297mm x 420mm).


In layout select the columns 

option and choose 3 columns


In View make sure ruler is ticked and then adjust the top margin on the left-hand side so that the space at the top is reduced so that you have a lot more space on the page for all the writing you’re going to have to do.


Repeat this process with the ruler across the top of the page on both left and right-hand sides. Make sure before you make the adjustments the double ended arrow appears before sliding the margin across, you’ll also see “left margin” appear just before you make the adjustment. Repeat on the other side.


In between the columns, you’ll see on the top ruler grey zones which indicate the ‘Gutters’ these will be too wide and similarly you need to click on these. When you see the double ended arrow adjust these so that they are slightly narrower.


Now type any 2 words in the first column at the top. (I’ve used ‘Start & finish’ here)  Place your cursor in between the two words and using the enter or return key on your keyboard force the 2nd word down the column into the 2nd and 3rd column until it creates a 3rd page.


Now using CTRL and A together highlight the whole document. While the document is highlighted go up to home and choose the font and font size… Calibri and 11.
Finally, whilst still highlighted and in the Home tab choose from the styles box No spacing. 

If this has been done correctly, you should be able to move images and text around easily in the first two pages. 

Further tips...

Collect all of the images you intend on using and save them in a folder 'Unit 09 research images' and 'Unit 09 work' for your own images you shoot.

Import the images one at a time as you need them in the work - for some reason I find importing several images causes issues as well as dragging and dropping them around the document. I find copying them CTRL + C and then pasting them CTRL + V the best way of doing it. Simply click on the page where you need the images to go when pasting in. (CTRL + X cuts the image out of the page).

Your pages should be 'Visual' with far more images used than text. Try and strike a balance where you have 75% images and 25% text. If you like writing and can't help yourself but write - change the size of your text CTRL + A (select) and the go up to the font size and change to 10 point Calibri or 10.5 - if you're using half sizes you have to type this into the field (box). 

Image control - Constraining proportions. As you import your images most of them will go into the columns nicely, but some will need to be re-sized...


In word simply click on to the circle at A (above) and drag the bottom right-hand corner either in or out so that the image fits nicely into the width of the column within the gutter and margin. The check to see that the layout options are set correctly. Click on to the symbol at B by clicking on the image. The symbol with the line and half-circle appears, now click on that and the layout options box appears. Click on the one indicated by the red C and select it "Tight". Finally click the open for "Move with text" circled in the red circle D

It's best to work with the design sheet/s daily and update it every-time you do some work in the order that you do the work. You can work with just one design sheet, but you run the risk of losing or deleting all of the work in one false move. Personally I would have several design sheets for each of the sections of the work...

(1). I'd keep the research together in one design sheet or two.
(2). I'd start a new design sheet for all of the records of my practical work which will normally be several pages long.
(3). I'd have both the finals in one design sheet.
(4). I'd write the final evaluation in a separate design sheet.

Turning into a PDF for Turnitin submission.

Once I'd done as much as I could and was ready to submit I would convert each of your design sheets into PDF files. 


In "file save as" click the drop down arrow at A and then choose PDF at B

The next bit you may have to do in college as you'll need to use Adobe Acrobat to combine the separate files (Design sheets) into one single PDF document.

The work should appear in the following order - The first pages should be your research. The next pages should be all of your practical stuff identifying your use of MTP's and the write ups about the MTP's and the way that you used them, how you used them etc - with images, diagrams etc. These pages should also include as many of your pinhole image - both positive and negative types. Following this should be your 2 final images presented as below on two separate A3 sheets and the final page will be your evaluation. You should end up with a PDF file that is 11 pages or more.


Saturday, October 3, 2020

Objective Fashion Portrait Week 2.

Week 2 - Objective Fashion Portrait.


Tuesday - Task 1 (Quick task) You're going to be set a task initially using your phones to take Objective Portraits and I'm going to suggest that you try and connect the people in the images by the use of their clothing, styling etc to try and incorporate the fashion element.

If you've done the research into Ruff and Objectivity you're going to be more aware of the need for consistency in your approach/process when setting up and composing the images. I will want to see in your design sheets a set of 4 people shot with your phones using the same composition when framing the images. Pay attention to the quality of your light as well.

Tuesday Task 2 (Studio deadpan).

This is  your introduction to the Studio. (See link in the sidebar on left). 
You will need your DSLR camera, fully charged and your SD card and some way to get the images off of your camera and onto your USB drive so that they can be accessed at college. 

The composition rules for the poses will be similar to the shots done in B&W in the atrium and you're encouraged to shoot 4 or more different people to potentially have a set of four. Everyone will need to shoot a fair amount of images ideally - four different people on different backgrounds. Hopefully, 3 sets will be constructed in the studio meaning you'll work in groups of 3 (9 people shooting) and the others modelling. 

As usual take wide shots of the set (Lights - model - background etc). Use this introduction here to write up a plan and copy the details I will write up on the white board in the studio along with the 'Floor plan' diagram. Explain the camera set-up (Settings) and the lighting technique.

By the end of Tuesday you will have tried 3 different ways of creating these images. You can add more methods independently by...

(1). Buying and using Coloured film in the Pentax K1000 and shooting using Daylight.
(2). Buying and using Coloured film in the Pentax K1000 and shooting in the studio.
(3). Using B&W film in the Pentax K1000 and shooting in the studio.
(4). Using your DSLR camera and shooting using daylight.

If you want to use the Pentax K1000 you will need to book it. Photocopy your ID card and print it off. Write on the piece of paper with your ID card image 'Pentax K1000' along with the date, your mobile phone number and how long you want to book it for. Then take the piece of paper with these details to Sandra Brett on the 5th floor or me and one of us will hand over the camera. If you want to buy more film do so at the same time (Pay at reception). 

What next?

You now need to organise your own independent shoot for Thursday 8th, Tuesday 13th or Thursday 15th. You will need to choose your preferred method for creating the images excluding using your phones. You can use anyone - but there must be 4 different people. Additionally they must be linked by some form of fashion aspect. For instance... Four different people with

Red tops/coats - the focus is on the colour red.
Coats/Hoodies/jackets/Pullover/T-Shirts - the emphasis being the clothing item.
Hair cuts - this works if the people have the same style - shoot head and shoulders and try and get them to wear something really plain so the emphasis is the hair-style.
Hats - four different types of hats.
Shoes - Four different types of shoes.

You can shoot anywhere - in the studio using the lights, or out in the atrium taking whatever background you want to use. Or on the walkways/balconies using the poly backgrounds or the white background.

You can even shoot the images on your day off using whatever plain background you can find, but do it outside because inside will be difficult and I don't want you doing it with flash. If you choose this option remember to stick to the deadpan/objective conventions.

Top-tip - do it sooner rather than later, because you need to get it in your design sheets, complete the write ups and write a final evaluation. 


Wednesday, September 30, 2020

Objective Fashion Portrait check list

 This check list will be updated each day you're in.

Remember as much as you can use images to illustrate your knowledge and learning.

You can use these bullet points as headings.

  • Thomas Ruff research focus on his 'Creative Intention' *Note there's very little info on the materials/equipment. use the links on the right-hand side of the blog here.
  • Photographs/diagrams of the Pentax K1000
  • Photographs diagrams of how the camera is loaded (Screen grabs from a Youtube video) with notes about the 2 really important bits that they never mention.
  • Details about the camera (Basics).
  • Images of the HP5+ 135/36 film + descriptions of its key features (First few lines from the Product data sheet)
  • Screen grab of the product data sheet (First page) to demonstrate you know what it is.
  • Diagrams of how you measure the light (The needle diagram from inside the view-finder).
  • Explanations of how you take the light readings off peoples faces.
  • Details about where you focus and the composition rules (Diagrams of the composition options). 
  • Explanation of 'Objective photography' and the use of the deadpan expression and use of neutral body language (Creative Intention). 
  • Photographs of 'The set' e.g. your set up when shooting - usually a wide shot done on your phone or DSLR showing your model and the background and how and where the images were taken.
  • Explanations of the light and why it was fit for purpose.
  • Pictures of the developer tank and all its component parts.
  • Pictures of the developing sink and all the chemicals and equipment.
  • Pictures of the developer chemical bottle with the times and mixing ratios. 
  • Screen grab of the 'Digitaltruth.com' page with the data on how to mix up the developer. The details for the way we used the film are on the 4th row. 
  • Details of how the film was processed from taking out of the cassette in the dark to drying and washing. 
  • Pictures of the drying cabinet with film hanging up (Set this up again if you didn't get the shot). Or use this one here...
  • Images of Enlargers, easels, timers, the dryer and contact sheet printers with explanations - either your own versions of the diagrams on the walls at college or photos that you've taken of them.
  • Your contact sheet, test strips and your prints with explanations of the process.


Improvement prompts and ideas

 Many of the units as part of the evaluation require you to write about improving your work. Here's some tips with regards to writing t...