Click here 1st and watch the video.
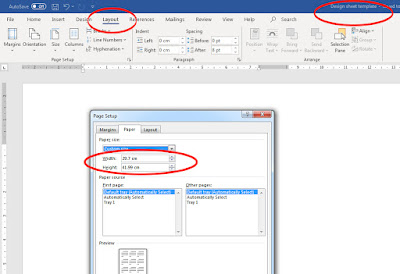
Open up a new word document, name it ‘Design sheet template’.
In layout set the page up to A3 (297mm x 420mm).
In layout select the columns
option and choose 3 columns
In View make sure ruler is ticked and then adjust the top margin on the left-hand side so that the space at the top is reduced so that you have a lot more space on the page for all the writing you’re going to have to do.
Repeat this process with the ruler across the top of the page on both left and right-hand sides. Make sure before you make the adjustments the double ended arrow appears before sliding the margin across, you’ll also see “left margin” appear just before you make the adjustment. Repeat on the other side.
In between the
columns, you’ll see on the top ruler grey zones which indicate the ‘Gutters’
these will be too wide and similarly you need to click on these. When you see
the double ended arrow adjust these so that they are slightly narrower.
Now type any 2
words in the first column at the top. (I’ve used ‘Start & finish’
here) Place your cursor in between the
two words and using the enter or return key on your keyboard
force the 2nd word down the column into the 2nd and 3rd
column until it creates a 3rd page.
Now using CTRL
and A together highlight the whole document. While the document is
highlighted go up to home and choose the font and font size… Calibri and
11.
Finally, whilst still highlighted and in the Home tab choose from the styles box No spacing.
Finally, whilst still highlighted and in the Home tab choose from the styles box No spacing.
If this has been done correctly, you should be able to move images and text around easily in the first two pages.
Further tips...
Collect all of the images you intend on using and save them in a folder 'Unit 09 research images' and 'Unit 09 work' for your own images you shoot.
Import the images one at a time as you need them in the work - for some reason I find importing several images causes issues as well as dragging and dropping them around the document. I find copying them CTRL + C and then pasting them CTRL + V the best way of doing it. Simply click on the page where you need the images to go when pasting in. (CTRL + X cuts the image out of the page).
Your pages should be 'Visual' with far more images used than text. Try and strike a balance where you have 75% images and 25% text. If you like writing and can't help yourself but write - change the size of your text CTRL + A (select) and the go up to the font size and change to 10 point Calibri or 10.5 - if you're using half sizes you have to type this into the field (box).
Image control - Constraining proportions. As you import your images most of them will go into the columns nicely, but some will need to be re-sized...
In word simply click on to the circle at A (above) and drag the bottom right-hand corner either in or out so that the image fits nicely into the width of the column within the gutter and margin. The check to see that the layout options are set correctly. Click on to the symbol at B by clicking on the image. The symbol with the line and half-circle appears, now click on that and the layout options box appears. Click on the one indicated by the red C and select it "Tight". Finally click the open for "Move with text" circled in the red circle D.
It's best to work with the design sheet/s daily and update it every-time you do some work in the order that you do the work. You can work with just one design sheet, but you run the risk of losing or deleting all of the work in one false move. Personally I would have several design sheets for each of the sections of the work...
(1). I'd keep the research together in one design sheet or two.
(2). I'd start a new design sheet for all of the records of my practical work which will normally be several pages long.
(3). I'd have both the finals in one design sheet.
(4). I'd write the final evaluation in a separate design sheet.
Turning into a PDF for Turnitin submission.
Once I'd done as much as I could and was ready to submit I would convert each of your design sheets into PDF files.
In "file save as" click the drop down arrow at A and then choose PDF at B.
The next bit you may have to do in college as you'll need to use Adobe Acrobat to combine the separate files (Design sheets) into one single PDF document.
The work should appear in the following order - The first pages should be your research. The next pages should be all of your practical stuff identifying your use of MTP's and the write ups about the MTP's and the way that you used them, how you used them etc - with images, diagrams etc. These pages should also include as many of your pinhole image - both positive and negative types. Following this should be your 2 final images presented as below on two separate A3 sheets and the final page will be your evaluation. You should end up with a PDF file that is 11 pages or more.


